
Hello Pythoneers and welcome in this article, we will cover cv2 boundingrect. Along with that, we will also look at its syntax for an overall better understanding. Then we will see the application of all the theory part through a couple of examples. We have covered different cv2 functions such as imshow and normalize. Before moving ahead with all those examples and other things, let us briefly overview the process.
cv2 boundingrect() is a function used to create an approximate rectangle along with the image. This function’s primary use is to highlight the area of interest after obtaining the image’s outer shape. With proper markings, the users can easily highlight the desired aspect in an image.
For example, in face recognition, after recognizing the face, the images are redrawn by using boundrect which covers the faces of recognized persons in the photo.
What is the CV2 Boundingrect Return Value?
Every function in the OpenCV is bound to return some numeric data or lists of data. In some cases where you have operations on the images, you might get ‘None’ as a return.
CV2 Boundingrect returns 4 numeric values when the contour is passed as an argument. These 4 values correspond to x, y, w, h respectively. These values are more described as –
- X coordinate
- Y coordinate
- Width
- Height
These values can be used to either draw a rectangle or crop out the image part using pixel coordinates.
Note: Remember that the Y coordinate in OpenCV, starts from the bottom of the image to the top of the image.
What are the input parameters in CV2 Boundingrect?
Contour is used in CV2 Boundingrect to get the best fitting rectangle of the contour area. Contour is an area outlet that is obtained after searching for certain patterns in the image. These patterns can be related to face recognition, smile recognition, convex hulls, etc. After searching for these patterns, we obtain a set of contours that resembles these patterns.
These contours are then used as a parameter in the Boundingrect function to get the best fitting rectangle of the set of points.
How to use cv2 boundingrect in Python
In this section, our primary focus will be on executing the function. To do we need to go through several steps that we will be looking at one at a time. But before that, we need to discuss the very idea of contours. They are a python list of all contours(curve joining all the points along the boundary) in the image. Each contour is a NumPy array of (x,y) coordinate of boundary points of the object.
Now let us start implementing the function. To do so, first, we need a sample image on which we can carry out operations. We need to convert the image into grayscale for a better overall result. After which we need to find contours and after which we can use our function to highlight them.
The code goes as follows:
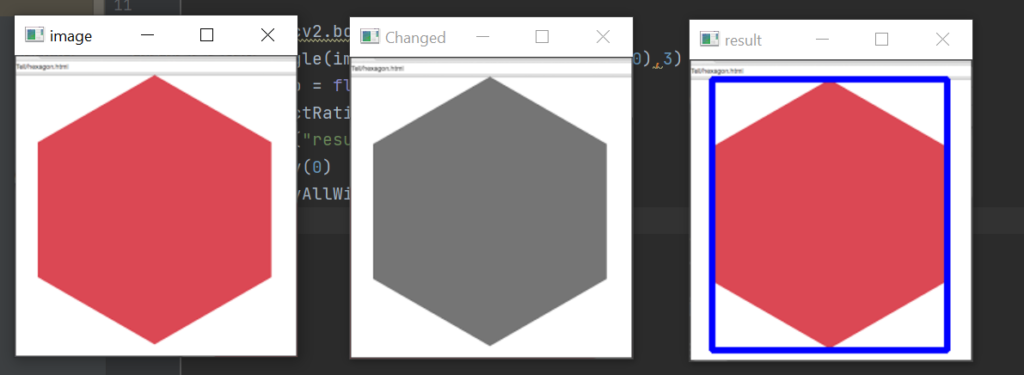
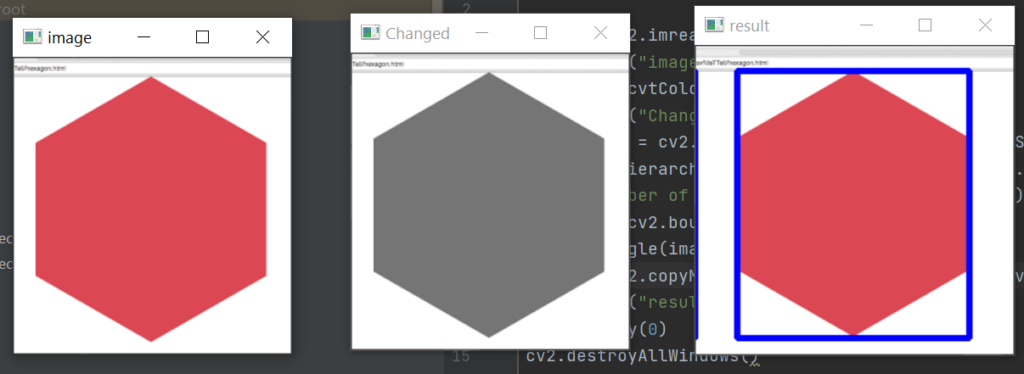
import cv2

image = cv2.imread("21.png")
cv2.imshow("image",image)
gray =cv2.cvtColor(image, cv2.COLOR_BGR2GRAY)
cv2.imshow("Changed",gray)
ret,binary = cv2.threshold(gray,127,255,cv2.THRESH_BINARY)
contours,hierarchy = cv2.findContours(binary,cv2.RETR_LIST,cv2.CHAIN_APPROX_SIMPLE)
print("Number of contours:" + str(len(contours)))
x,y,w,h = cv2.boundingRect(contours[0])
cv2.rectangle(image,(x,y),(x+w,y+h),(255,0,0),3)
cv2.imshow("result",image)
cv2.waitKey(0)
cv2.destroyAllWindows()
Above, we can see the code required for the function’s execution. Now let us go line by line and try to find out how it works. First of all, we have tried to display our subject image using the imshow function. Our focus is to convert the image into grayscale in the next step. To achieve it, we have used “cvtColor.” This function can convert the image from one color space to another. After this, we have used the “threshold” function to intensify the pixels in a grayscale image.
So far, we have completed 1/3rd of the whole procedure. In the next step, we need to find out the number of contours. To do so, we have used the find contour method. This takes three arguments, as shown in the code. After which, we have used the print statement to print the number of contours.

Here we have successfully find the values for contour. Now, after this, we have used the cv2 boundingrect function. This function in total returns a total of 4 points. Then we have used the cv2 rectangle method to draw a rectangle concerning coordinates. Finally, we get the following result, and hence our code is verified.
If we wish, we can also add padding to the image. All we need to do is copy the Make border function of the cv2 module. We need to add the following code to our code
image = cv2.copyMakeBorder(image, 5, 5, 16, 16,cv2.BORDER_REFLECT)
If you compare this image to the our above output. You can spot the difference between the 2 results.
Creating Multiple masks
Using the cv2 boundingrect function along with help of some other cv2 functions we can create multiple masks also. The code through which we can do it is given below also
import cv2
org=cv2.imread('3.jpeg')
cv2.imshow('sample',org)
img = cv2.imread('3.jpeg',0)
ret,thresh = cv2.threshold(img,127,255,0)
contours,hierarchy = cv2.findContours(thresh, 1, 2)
for cnt in contours:
    x,y,w,h = cv2.boundingRect(cnt)
    img = cv2.rectangle(img,(x,y),(x+w,y+h),(0,255,0),2)
cv2.imshow("image", img)
cv2.waitKey()
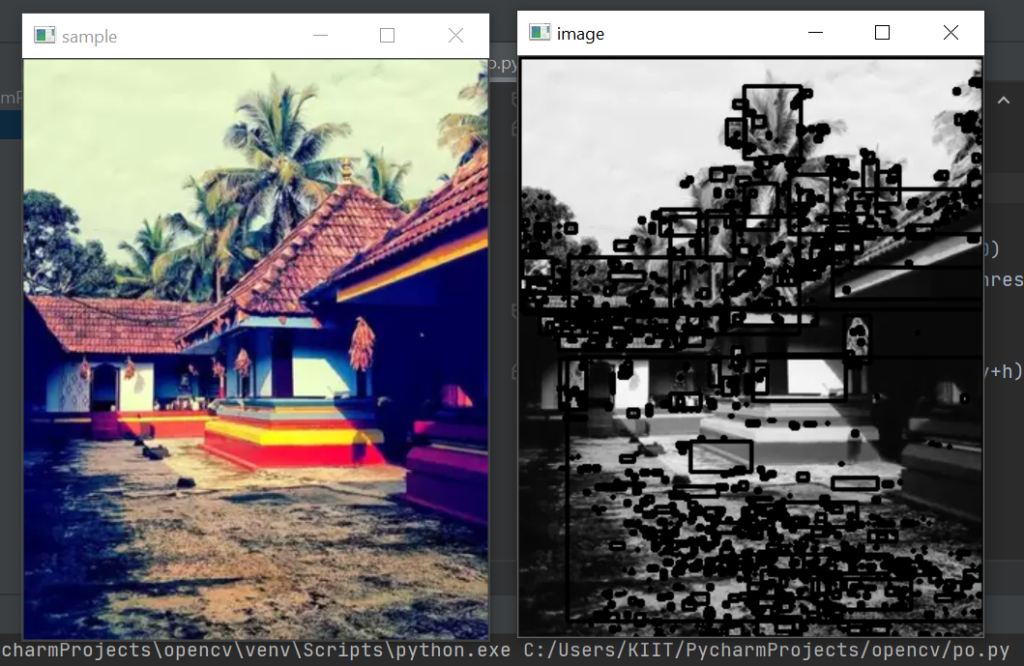
Here you can compare the original image and the masked image side by side.
Identifying digit using Contours
With this cv2 function’s help, you can also identify digits in the image. The code through which you can do so is given below.
import cv2
import numpy as np
image = cv2.imread( "9.png")
gray_image = cv2.cvtColor(image, cv2.COLOR_BGR2GRAY)
th, threshed = cv2.threshold(gray_image, 100, 255, cv2.THRESH_OTSU|cv2.THRESH_BINARY_INV)
cnts = cv2.findContours(cv2.morphologyEx(threshed, cv2.MORPH_OPEN, np.ones((2,2))), cv2.RETR_EXTERNAL, cv2.CHAIN_APPROX_SIMPLE)[-2]
nh, nw = image.shape[:2]
for cnt in cnts:
    x,y,w,h = bbox = cv2.boundingRect(cnt)
    if h >= 0.3 * nh:
        cv2.rectangle(image, (x,y), (x+w, y+h), (0, 0, 0), 10, cv2.LINE_AA)
cv2.imshow("dst", image)
cv2.waitKey()
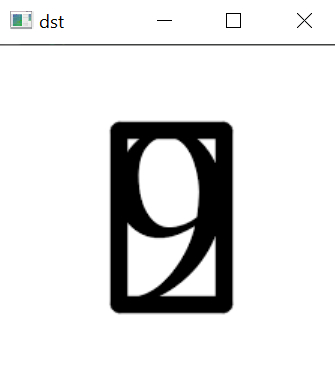
See after successfully executing the program a rectangular box is drawn around digit in image.
cv2.boundingrect error – 215 assertion failed?
This error type generally occurs if you have defined contours [0] else contours [1]. This was correct to use in the older versions of open Cv, but you need to define contours = contours[0] only for the newer versions.
Conclusion
In this article, we covered the cv2 boundingrect. Besides that, we have also looked at its syntax and arguments. For better understanding, we looked at an example. We then went line by line of code and understood how it works. We can conclude that it helps us by drawing a rectangle around the binary image.
I hope this article was able to clear all doubts. But in case you have any unsolved queries feel free to write them below in the comment section. Done reading this. Why not read about python lock next.
cv2 can compute contourArea of a contour, but could you simply use the boundingRect result for width and height to give a close approximation for the contour area?
If you need area, I’d suggest you stick with contourArea. BoundingRect area will always give you a result greater than or equal to contourArea.