Want to understand and work on the language which your computer and languages like python understand? Just go through this article one, we will help you achieve your goal. In this article, we will learn about an exciting module in python known as python bitstring.
Python Bitstring is generally defined as a module that makes the creation, analysis, and manipulation of binary data (contains only 0 and 1) simple and natural.
We will see how we can create bitstrings and how to perform operations on them. And if you are working on Python 2.7, you don’t need to worry, and the python bitstring module supports both versions- 2.7 and 3.
Syntax of Python Bitstring Module
We cannot use the module until and unless we install it in our systems.
To install use – pip install bitstring.
Classes in Bitstring module
The main aim of the module is to help us in working with Binary data in python programming language and make it as easy as possible. And that is why the module compromises four classes, which will help us accomplish all of our tasks. Let us understand the basics of each one of them.
Bits(auto=None, length=None, offset=None, **kwargs)
The primary use of this class is to create a container that holds an immutable sequence of bits. By immutable, we mean that it cannot be changed after creation.
Parameters–
Auto: It can be a string of comma-separated tokens, an integer, a file object, a bytearray, a boolean iterable, an array, or another bitstring. By default, it is None, and you can leave it like that by using a keyword argument.
length: the length of the bitstring in bits, if needed and appropriate. It must be supplied for all integer and float initializers. The valid values for length for float is either 32 or 64.
Offset: This parameter can only be used when we are using bytes or filename initializers. If we want to ignore some of the starting bits, we can use the offset parameter.
**kwargs: In this parameter, we can give the type and value from which we want to create a bitstring. It can be bytes, bin, hex, oct, uint (unsigned int), int, filename, and many more types.
Return Type Python bitstring . bits:
It returns ‘bitstring.Bits’ type of output.
Some of the common methods are all(), any(), count(), endswith(), find(). We are not going to study the theoretical part of these methods because doing that now will make the topic rather confusing. We will try to use them in our programs later on.
class bitstring.BitArray([auto, length, offset, **kwargs]) of python Bitstring
This class is the derived class of Bits class, which we studied earlier. The primary and fundamental difference is that BitArray returns mutable bitstrings. It means the content of bits can be modified after once created.
Parameters are the same for BitArray class are the same so that you can refer them from above.
Return Type:
<class ‘bitstring.BitArray’>
Some common methods are append(bs), byteswap(), clear(), insert().
bitstring.ConstBitStream([auto, length, offset, **kwargs])
This class is also a derived class of Bits class. All the methods available in Bits class are available in the ConstBitStream class. The auto initializer is also the same. In ConstBitStream, the class has some added properties and methods which allow bits to be parsed as a stream.
We are not going to discuss parameters because they are the same as above.
Return Type Python Bitstring-
<class ‘bitstring.ConstBitStream’>
Some common methods are bytealign(), peek(), peeklist().
Bitstring.BitStream()
This class is almost the same as the ConstBitStream class. The only difference is that this class allows mutable bit steams.
Return Type-
<class ‘bitstring.BitStream’>
Enough of theory for now! Let us directly jump to the practical part of this module.
Implementing the Python Bitstring module
Following examples demonstrate the usage of Bitstring module –
- Converting Various datatypes into BitString
- How to append into python bitstring
- Performing Slicing Operation
- Creating a ConstBitStream and performing peek operation on it
- Reading the bitstring
- Working on BitStream Class
a. Converting Various datatypes into BitString
from bitstring import Bits
#Converting a hexadecimal into bitstring
string1 = Bits(hex='0xff470001')
#Converting a octadecimal into bitstring
string2 = Bits(oct='0o4464')
#Converting a binary string into bitstring
string3 = Bits(bin='0b001010110101')
#Converting a integerl into bitstring
string4 = Bits(int=-1540, length=12)
#Converting a unsigned integer into bitstring
string5 = Bits(uint=2300, length=12)
#Converting a bytes into bitstring
string6 = Bits(bytes=b'\x93@', length=12)
print(string1)
print(string2)
print(string3)
print(string4)
print(string5)
print(string6)
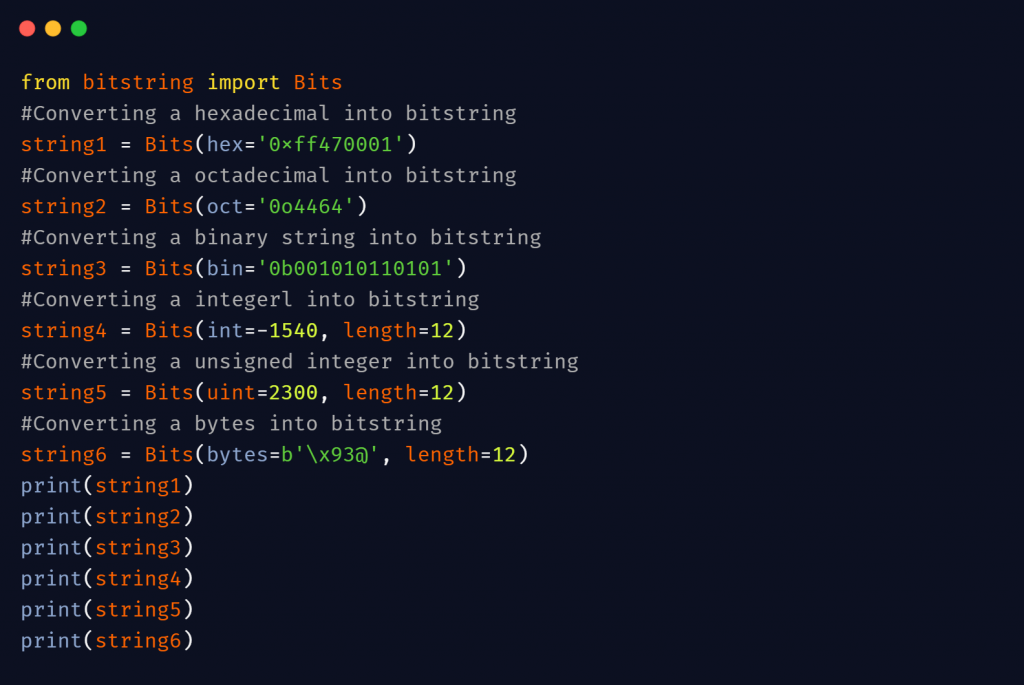
0xff470001
0x934
0x2b5
0x9fc
0x8fc
0x934
b. How to append into python bitstring
We cannot append on Bits class, but we can use BitArray class for the same.
from bitstring import BitArray
bas = BitArray('0xbad')
# appending hexadecimal string at last
bas.append("0xff470001")
print(bas)
0xbadff470001
c. Performing Slicing Operation
ba = BitArray('0b00011110')
# We can perform slicing on the bitstring
b = ba[3:7]
print("Original string:",ba)
print("Sliced string:",b)
Original string: 0x1e
Sliced string: 0xf
d. Creating a ConstBitStream and performing peek operation on it
from bitstring import ConstBitStream
s = ConstBitStream('0xff47000')
s.peek('hex:12') # integer is 4 bytes
'ff4'
e. Reading the bitstring
s = ConstBitStream('0x12345678')
print(s.read(12))
0x123
f. Working on BitStream Class
from bitstring import BitStream
string = BitStream(oct='0o4464')
string.append('0o4')
print(string)
0b100100110100100
Must Read:
- How to Convert String to Lowercase in
- How to Calculate Square Root
- User Input | Input () Function | Keyboard Input
- Best Book to Learn Python
Conclusion
Python Bitstring module has made it very easy for us to play with bits and bytes (0’s and 1’s). There are 4 classes and many methods in the module. Please explore and try learning even more methods.
Try to run the programs on your side and let us know if you have any queries.
Happy Coding!